Custom Unity Editor UI Library
In the previous article, I’ve briefly mentioned my Unity Editor UI Library and wanted to go more in-depth on how I started structuring custom Editor code and why not go the default way.
Unity Editor UI (IMGUI)
In its current form Unity Editor UI (IMGUI) leads to really messy and unreusable code, and while making a plugin for the Unity Asset Store I thought about this,
I could use static functions to combine a few common Unity calls, but this would not hide the state that goes along with it, for example, the checkbox holding its current state.
In pure Unity Editor Ui you need to do this:
 1using UnityEngine;
 2using UnityEditor;
 3
 4public class EditorCheckboxWindow : UnityEditor.EditorWindow
 5{
 6    bool value = false;
 7
 8    void OnGUI()
 9    {
10        value = EditorGUILayout.Toggle("Checkbox Text", value);
11        if (value)
12            // do the work
13    }
14}
So always store and pass the current value to the EditorGUILayout.Toggle.
The problem emerges when on one window you have a bunch of controls with its UI state, plus your own logics state – the code may become really messy.
And if you want an event when checkbox changes value, for each place you need additional code
1void OnGUI()
2{
3    bool newValue = EditorGUILayout.Toggle("Checkbox Text", value);
4    if (newValue != value)
5    {
6        value = newValue;
7        SomeMethod(newValue);
8    }
9}
Which would be worse if you have a few checkboxes or similar elements on the same window.
Object-Oriented UI
So instead, naturally the idea of hiding state and logic inside classes (object-oriented style) comes to mind.
Initially, it looked like this:
 1public class Checkbox
 2{
 3    private bool _checked;
 4    private string _text;
 5    private Action<bool> _onStateChanged;
 6
 7    public Checkbox(string text, Action<bool> onStateChanged = null)
 8    {
 9        _text = text;
10        _onStateChanged = onStateChanged;
11    }
12
13    public void Draw()
14    {
15        var prevState = _checked;
16        _checked = EditorGUILayout.Toggle(_text, _checked);
17
18        if (prevState != _checked)
19        {
20            _onStateChanged?.Invoke(_checked);
21        }
22    }
23}
This doesn’t look too different from the regular OnGUI version, but you hide the state inside the instance and reuse the code, you don’t need to implement events again each time. And now any checkbox I use has the option to throw events if I’ll need it.
With time I’ve also added a tooltip and a few other methods, so this is how it looks like:
 1public class Checkbox
 2{
 3    private bool _checked;
 4    private string _text;
 5    private Action<bool> _onStateChanged;
 6    private string _tooltip = string.Empty; // string.Empty is the disabled state of the tooltip
 7
 8    public Checkbox(string text, bool isChecked = false, Action<bool> onStateChanged = null)
 9    {
10        _text = text;
11        _checked = isChecked;
12        _onStateChanged = onStateChanged;
13    }
14
15    public Checkbox SetTooltip(string tooltipMessage)
16    {
17        _tooltip = tooltipMessage;
18        return this;
19    }
20
21    public bool IsChecked()
22    {
23        return _checked;
24    }
25
26    public Checkbox SetChecked(bool isChecked)
27    {
28        _checked = isChecked;
29        return this;
30    }
31
32    public void Draw()
33    {
34        var prevState = _checked;
35        _checked = EditorGUILayout.Toggle(new GUIContent(_text, _tooltip), _checked, GUILayout.ExpandWidth(true));
36
37        if (prevState != _checked)
38        {
39            _onStateChanged?.Invoke(_checked);
40        }
41    }
42}
43
44/*
45The event could have been a 'public event Action', to allow changing the subscribers after object creation.
46
47Checkbox is returned from some methods so that you could chain object setup, without having a ever growing constructor and at the same time, be able to set something after setup.
48Usage looks something like this:
49    new Checkbox("text").SetTooltip("tooltip").SetChecked(true);
50*/
The class may look bigger than the pure Editor UI version above, but this one also has extra functionality that is written only once, where in the original case this code is most commonly duplicated all over the editor code-base.
Doing it this way, I’m ok with adding more functionality, because it can be later reused, not only in a different part of this project but in the next one as well.
TextField with Autocomplete
As you can imagine, I’ve converted more classes that just the Toggle, but this way is great not only for wrapping, but also to extend default behavior.
Once you already have a TextField class, it can be derived to add autocomplete (or made optional in the main class).

Autocomplete may be useful when there are some predefined values, but you also need the option to add anything new. Or maybe there are too many options to choose from the dropdown. Rarely opening Script Execution Order in Unity, I wish I could just type with autocomplete, instead of going through a huge dropdown.
As you may have noticed on the screenshot above, it can be nice to show something even when there is a typo, so I’ve also added approximate (or fuzzy) string matching, you just click the option, and get the correct string.
Now let’s cover how you could add your own custom classes that add specific logic and also combine all these elements together.
Overall Structure
To combine this all together, the idea is to have all UI elements implement the same interface. But also use composite classes that can hold a multiple of this interface, while at the same time, implementing this interface. This way they can be nested in any way. This idea was primarily taken from the Gang of Four book.
Here is the IDrawable interface
1public interface IDrawer
2{
3    void Draw();
4}
That is it. Nothing more.
So for example to make this:
you would use a hierarchy like this:
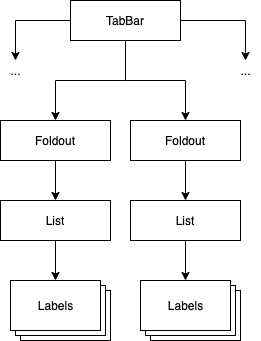
where each of the classes (TabBar, Foldout, List, Label), all implement the IDrawer interface, and all except the “Label” get a list of IDrawer’s in a constructor or after creation.
For example, TabBar can have one IDrawable for each tab. And you would just create the classes, pass them in, and then call Draw on the root IDrawable, everything else will handle itself, current tabs will be remembered, checkboxes will store their state, etc.
The TabBar itself will have references to all passed IDrawable’s, but call only one Draw at a time.
In code it looks something like this:
 1public class TabBar: IDrawer
 2{
 3    private string[] _tabNames;
 4    private IDrawer[] _drawers;
 5    private int _selectedTab = 0;
 6
 7    public TabBar(string[] tabNames, IDrawer[] drawers)
 8    {
 9        _tabNames = tabNames;
10        _drawers = drawers;
11    }
12
13    public void Draw()
14    {
15        _selectedTab = GUILayout.Toolbar(_selectedTab, tabNames);
16        _drawers[_selectedTab].Draw();
17    }
18}
The Foldout works very similarly, it either calls Draw() if it is in the open state or just draws the foldout itself.
If done like this, anything that is inside the TabBar or the Foldout (the IDrawer’s that are passed in), can be moved outside and rearranged without touching the actual logic class or the TabBar, just the composition part.
Custom UI elements with IDrawer
It is important to note that IDrawers are not only the library-like code (i.e. checkboxes), but also your own logic classes.
This may include your own reusable UI elements, for example, a class that gets your specific data in the constructor and knows how to display it, probably by using more IDrawer’s of its own. These classes can be reused on different Tabs or Windows. You can even reuse whole hierarchies.
You can also have IDrawer classes with some specific logic that executes when the button press event is fired or the checkbox toggled, for example, changing something on the filesystem.
Because everything is a class you can also separate logic from the view, either passing dependencies in the constructor, or wire UI events to your domain logic. Maybe even try using MVC/MVP in some form.
Final thoughts
This way of doing interfaces in UnityEditor is a lot nicer than the standard way and can be easily extended when needed. I think this way better lends itself to the problems you are trying to solve, at least it is more familiar to day-to-day programming in C# than the procedural IMGUI-style.
Since making this library Unity announced the new UI system (UIElements), that also can be used for the Editor UI, which is similar to the web-style user interface, and as far as I understand – it will eventually replace IMGUI.
Because implementation is encapsulated, I have the option to replace the internals of library classes, without changing any actual Plugin code. I also like that I can replace parts of the hierarchy, calling Draw by hand, and not redo the whole thing.
For the moment it is also important to support older Unity versions as people don’t migrate as quickly and UIElements initial releases start with Unity 2019, and still leaves questions if it is production-ready.
For writing small one-off editor utility I wouldn’t think about it, but for a sizable UI with reusable elements and for the reduction in code complexity, I think the library turned out to be a great option and for now, I will continue using it.